
Get help
Product Activation
FAQ’s
Downloads
Visit http://www.mywifiext.net Smart wizard.

- Select a wireless network.
- Click on the Next button.
- To connect, enter mywifiext.
- Select the next option.
- Register your extender.
- Finally, click Finish to complete the mywifiext setup.
-
What is the website www.mywifiext.net?
If you are new to WiFi range extenders, the first thing you should know about is www.mywifiext.net.
You may be wondering why this is so.
It is recognized as the default web address for WiFi extenders and is used for a variety of reasons.
The primary advantage of mywifiext local setup success is the installation of a new extension.
Aside from that, mywifiext.net provides a wide range of features such as modifying extender settings, upgrading firmware versions, changing network names and passwords, and so on.
The important thing to note here is that mywifiext is not like other websites you visit on the internet.
Instead, the device's maker just provides its customers with a local extender login web address.
Consequently, to access it, the extender should either connect by a wireless connection or using an Ethernet cable.
Let’s get to know the amazing benefits of mywifiext local set up success!
WWW.MYWIFIEXT.NET CREATE AN ACCOUNT
If you're still having problems, don't worry; we'll help.
-
Is it truly necessary for me to make an account at www.mywifiext.net?
This is the minimum need for logging in and configuring the extension.
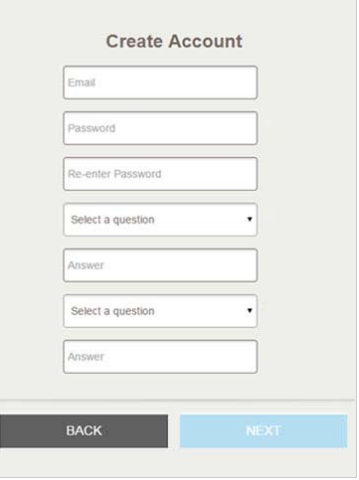
To create a mywifiext account, navigate to the http://mywifiext web address in your internet browser.
Now, click on the mywifiext.net account creation button.
Enter all of the essential information and then click Next.
Accessing your account with your mywifiext login password will take you to several pages, including those listed below.
Not able to get on mywifiext.net?
Are you having problems accessing the mywifiext.net webpage? We’ve got you covered, so don’t worry. The most common issues with mywifiext.net or mywifiext local address can be rapidly resolved by following the guidelines in this section. Thrilled? Allow us to help you set up http://mywifiext-local or mywifiext.net properly.
Modify MTU size and create a DMZ (neutral territory) server.
- Set up the new SSID and select the desired security type.
- Change the range extender mode to access point mode, and vice versa.
- Manage all of your connected USB drives to the range extender.

Trouble with you Extender
- The extender’s power supply should be continuous.
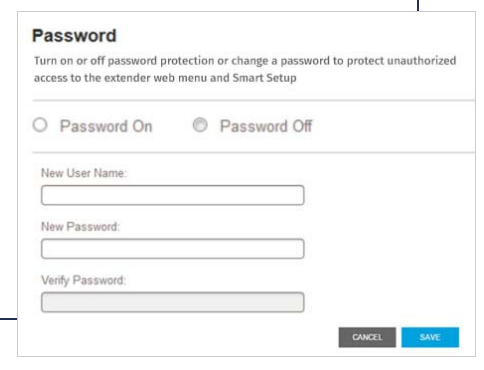
- To log in, provide the right mywifiext local address.
- Only use the most recent web browser version to visit www.mywifiext.
- Place the extender out of reach of electronic gadgets, metallic objects, and reflective surfaces.
- Make sure that electrical connections are finger tight.
- The firmware for the extension and router should be up to date.
- Never use a damaged power socket or cable.
Chat With Us
Chat WIth Our Experts and get real time answers to all your queries related to netgear extender .
Mail Us
Write to Our Experts and they will get back to you in the least possible time.

Where should I install my WiFi extender?
- So, you have completed the www mywifiext account creation process!
- There is now a requirement to navigate to the default mywifiext net login page.
- Here are some recommendations to help you set up mywifiext locally.
If Issue still presists reach out to us

www.mywifiext.net OPEN AN ACCOUNT
- Your extension should be placed in a strategic spot in your house or business.
- However, be sure that the extender is within range of the present WiFi router.
- Furthermore, the gadget should be located at a specified distance from interference-causing items such as microwave ovens, cordless phones, mirrors, refrigerators, glasses, cordless phones, and related equipment.
- WAN Setup
- Operating Mode
- Wireless Settings
- USB Settings
Chat with our technical engineer to get your issue resolved

WPS’s primary goal is to protect your home or workplace network. Users can set up their Netgear extenders without an installation CD by using this method. You don’t have to manually enter the login and passcode to connect to a WiFi secured setup. Contact our specialists if you experience any issues when utilising the WPS setup.
A central part of your home or business is the ideal placement for your extension. Make that the extender is situated inside the present WiFi router’s coverage area. Additionally, the device should be set a particular distance away from objects that cause interference, such as cordless phones, microwave ovens, mirrors, refrigerators, glasses, and similar gadgets.
On your computer, open a web browser and go to the mywifiext.net start page. To log in, type your username and password. Go to the area for associated devices and make a note of the name and IP address. Once finished, use this address to log in to your Nighthawk extender. You will now see the Netgear extender login page in its most basic form. Contact our professionals if you experience any difficulties logging into the Nighthawk extender.
The handbook that came with the extension purchase has the default mywifiext login information. Reset your extender to its factory default settings if you have modified the details and lost the passphrase. After that, you can log in to extenders using the standard username and password.
Troubleshoot Common Problems
Can’t access Mywifiext?
- Mywifiext keeps popping up
- Unable to access the extender’s login page
- The www mywifiext net setup wizard not opening
- Can’t find the server
- http://mywifiext-local website can’t be reached
- Can’t get mywifiext local set up success
- Mywifiext setup web page cannot be found
- The page keeps asking for username and password
- Can’t login to the WiFi extender
Mywifiext net Login Issues
- Improper WiFi signal
- Router configuration issues
- Pre-shared key and SSID Issue
- Problems with LAN card
- Corrupted Internet exe file
- Outdated firmware version
- Issues with your web browser
- Intermittent wireless connection
Mywifiext.net Troubleshooting Tips
- Extender must be turned on.
- Use another web browser.
- Try using the default IP address.
- Clear cache and history of your browser.
- Put your extender away from interference.
- Cross-check the entered web address
mywifiext.net smart wizard
- Select your wireless network.
- Click on the Next button.
- Enter mywifiext to connect.
- Click the Next option.
- Register your extender device.
- Finally, click on the Finish button and complete the mywifiext setup.
Looking For Help ?
FAQ's
Many consumers enquire as to why their WiFi extender won’t connect to our technical experts, so they can offer the answer. If you are experiencing the same issue, don’t be concerned. You face the chance of experiencing connectivity issues with your extender since WiFi-causing devices are placed close to your router and extender. To fix the WiFi extender not connecting issue, move your WiFi devices far away from things that emit radio waves, such as Bluetooth speakers, microwave ovens, cellular phones, baby monitors, etc.
Additionally, issues with internet connectivity may arise if your WiFi extender is not correctly linked to the router.
For this, you must double-check the cables connecting the two machines. If any breaks are discovered in the Ethernet cables, get new ones installed right once.
Nulla urna nibh, dictum eget libero vitae, pharetra porttitor metus. Nulla cursus condimentum orci, id egestas nisi viverra in. Duis sit amet elit vestibulum, sodales tortor id, pellentesque urna. Duis consequat tempor libero. Mauris vel erat et lacus rhoncus feugiat.
Firmware updates are offered for enhancing users ‘experience when it comes to enjoying internet. But, sometimes, users are not able to make the most of their extenders after updating firmware on them. If your WiFi extender is causing problems after firmware update, then chances are you have updated the wrong or corrupted firmware version on your WiFi device. To rid yourself of the issue, you need to reset WiFi extender to the default settings and install it again.
My WiFi extender indicates no internet is another frequent problem that has many WiFi extender customers scratching their heads. If your extender is not installed correctly or you are not receiving proper internet from your Internet Service Provider, a problem may arise.
Ping the router to which your WiFi extender is attached to see whether you are receiving internet from your ISP in order to resolve the WiFi extender reports no internet issue. If it is not the cause of the issue, reset your range extender and reinstall it. Get in touch with our technical experts for quick setup of your WiFi extender.
Netgear WiFi extender app is offered by the company to help users setup and manage their extenders in a hassle-free manner. But, it has been witnessed that the Netgear WiFi extender app is creating issues for many users. If you are also bothered by the same, check whether you have installed the latest software version of the app. If not, download the latest version of the Netgear WiFi extender app now only. Still same? Well, in that case, you need to approach our experts. They will diagnose why your Netgear WiFi extender app is creating issues and then fix it for you in a matter of minutes.
No one likes to use the internet with lag. This is why another frequently asked question that our team of experts handles every day is – why is my wifi extender so slow.